Flutter CustomPainter - Progress Indicator with an Image
Written by Chris Tomy.
Introduction
This post will explain how I implemented a widget that displays some fraction visually in a circle, using an image as a marker for the end point. Correctly transforming/resizing/rotating the image was the main challenge, which I will describe.
Here’s a quick sketch of my goal:
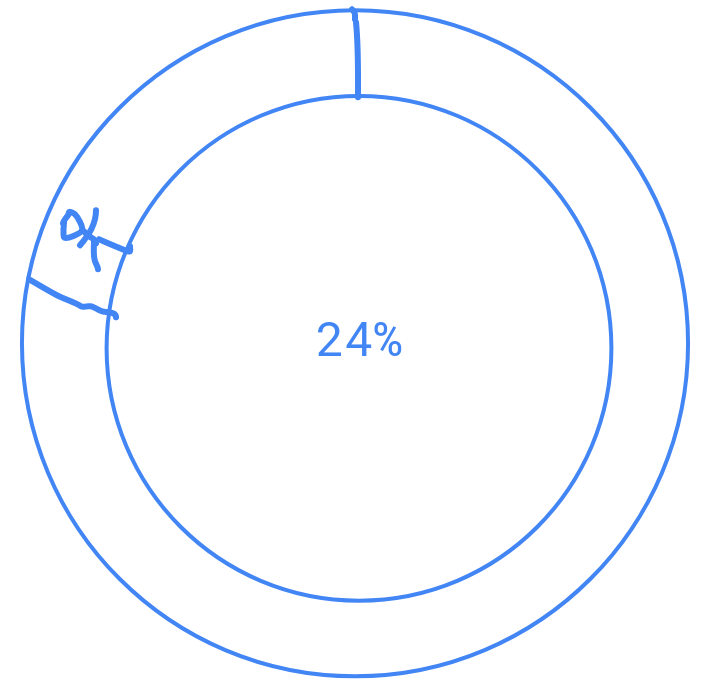
The stick man represents the image. So as the goal/progress changes, the circular progress changes as well. (I’m being intentionally generic in what the progress is actually for. This will allow us to reuse it if needed.)
Without CustomPainter?
If your use case is simple, you could use CircularProgressIndicator, which
expects monotonically increasing values from 0.0 to 1.0. However, there isn’t
a convenient way to display an image at the end of the bar.
It might be possible to do it anyway without a CustomPainter, instead just carefully laying and positioning widgets on top of each other, but CustomPainter is better designed for controlling the size of what we ultimately want to create.
Prerequisites
I assume knowledge of Flutter, Dart & basic knowledge of working with CustomPainter, i.e. you have watched this 5 minute video.
General Approach
The idea would be to
- Draw two circles with different radii
r_1andr_2(s.t.r_1 > r_2) about some center point(x, y). They should have different colors. - Draw an arc (or circle sector) about
(x, y)with angleprogress*2\piradians and radiusr_1. This should have another color. - Assuming the image is already correctly sized, rotate it
-1*progress*2\pi. This is negative because the circle/progress increases anticlockwise. - Place the image at
((r_1+r_2)/2, -1*progress*2\pi)in polar coordinates, about(x,y)and with the polar axis pointing upwards.
I use radians for all angles.
Implementation
Time to implement this in Flutter/Dart. Since I’m only using it to demonstrate
the user’s progress on a step goal I’ll call my new class StepGoalPainter.
It would be easy to refactor/rename if needed. Here’s the main structure of the class:
import 'dart:ui' as ui;

class StepGoalPainter extends CustomPainter {
    final double completed;
    final ui.Image marker;

    StepGoalPainter(this.completed, this.marker);

    @override
    void paint(ui.Canvas canvas, ui.Size size) {
        // TODO: implement paint
    }

    @override
    bool shouldRepaint(StepGoalPainter old) {
        // TODO: implement shouldRepaint
    }
}
Here I’m subclassing CustomPainter and also expecting two arguments to determine
the paint. completed should be a fraction, and marker will be the image.
I’m using a stateless & declarative style, i.e. painting based on the current
given ‘state’ (completed), rather than retrieving it in this class.
Note that I’m using a named import to avoid conflicting with other definition(s)
of an Image (e.g. from widgets library).
The paint function is the main part of the class, but let’s finish the easy one,
shouldRepaint.
    @override
    bool shouldRepaint(StepGoalPainter old) {
        return completed != old.completed || marker != oldDelegate.marker;
    }
This tells flutter when to repaint, and more importantly, when not to. This should help flutter optimize repaints.
Now, let’s add steps 1 & 2 to paint:
    @override
    void paint(ui.Canvas canvas, ui.Size size) {
        // the size we have to paint on should be finite so we can determine
        // the center point to draw from:
        assert(size.isFinite);
        // sanity check to ensure we're given a valid double:
        assert(!completed.isNaN)

        Offset center = size.center(Offset.zero);
        // this ensures we're working with a fraction
        final fraction = completed.clamp(0, 1);
        final radius = size.shortestSide / 2; // this is r_1
        final innerRadius = radius * 0.8; // r_2

        // setting up some colors
        final outerPaint = Paint()
            ..style = PaintingStyle.fill
            ..color = Colors.grey.shade200;
        final innerPaint = Paint()
            ..style = PaintingStyle.fill
            ..color = Colors.purpleAccent;
        final midPaint = Paint()
            ..style = PaintingStyle.fill
            ..color = Colors.white;


        // outer circle of radius r_1:
        canvas.drawCircle(center, radius, outerPaint);
        // arc of radius r_1:
        canvas.drawArc(
            // drawArc uses a rectangle to determine the position of the arc:
            Rect.fromCenter(center: center, width: size.width, height: size.height),
            0.75 * 2 * pi, // start point is the upper axis
            -fraction * 2 * pi, // theta
            true, // make it a circle sector
            innerPaint);
        canvas.drawCircle(center, innerRadius, midPaint);

        // TODO: resize, rotate, translate and draw the image here
    }
Note that generally, order matters when using any method on canvas.
So drawing the arc after the circle will place the arc on top of the circle.
Here’s the rest of the code for the paint function, commented in detail:
    @override
    void paint(ui.Canvas canvas, ui.Size size) {
        // draw circles and arc here, as shown above
        // ...

        // Dealing with the image:
        //
        // target determines the resize. 0.15 means width of image will be 15% of the
        // of the canvas width:
        final target = 0.15;
        // c is the value s.t. c*image_width = target*canvas_width
        final c = (target * size.width) / marker.width;
        // the middle of both the previous radii:
        final midRadius = (radius + innerRadius) / 2;

        // x, y are values to translate by to get image onto the middle of the
        // ring. I use some basic trigonometry to convert the polar representation
        // to cartesian. There may be better ways of doing this, but this is
        // simple, and easier to understand.
        double x, y;
        // depending on the four quadrants:
        if (completed <= 0.25) {
            // In this case, we know it must land on the first quarter of the
            // diameter of the 'circle' we're using as a reference point, with
            // radius (r_1 + r_2)/2.
            // Therefore, we negate the x and y values, since we're working
            // relative to the center.
            final theta = completed * 2 * pi;
            x = -midRadius * sin(theta);
            y = -midRadius * cos(theta);
        } else if (completed <= 0.5) {
            final theta = completed * 2 * pi - 0.25 * 2 * pi;
            x = -midRadius * cos(theta);
            y = midRadius * sin(theta);
        } else if (completed <= 0.75) {
            final theta = completed * 2 * pi - 0.5 * 2 * pi;
            x = midRadius * sin(theta);
            y = midRadius * cos(theta);
        } else {
            final theta = completed * 2 * pi - 0.75 * 2 * pi;
            x = midRadius * cos(theta);
            y = -midRadius * sin(theta);
        }

        // the overall imageOffset is the sum of two offsets since one is
        // to move the image onto the middle ring, and the other is to shift the image
        // midpoint onto the middle ring, since we work in terms of the top-left
        // corner by default.
        final imageOffset = center
                .scale(1 / c, 1 / c) // we have to reverse the scaling done, using 1 / c
                .translate(-marker.width / 2, -marker.height / 2) +
            Offset(x, y).scale(1 / c, 1 / c); // here we use the x, y

        // note that canvas scales/translations/etc. affect any future shapes, not
        // the ones currently drawn

        // we resize the image first, this is why we needed to reverse the scaling,
        // when defining the image offsets:
        canvas.scale(c);

        // We want to rotate the image about it's midpoint, which won't happen by
        // default. In general to rotate some point A about point B, we shift our
        // center point to point B and perform the rotatation, then reverse the shift.
        // This is what I do here:
        canvas.translate(
            imageOffset.dx + marker.width / 2, imageOffset.dy + marker.height / 2);
        canvas.rotate(-2 * completed * pi);
        canvas.translate(-imageOffset.dx - marker.width / 2,
            -imageOffset.dy - marker.height / 2);

        // finally we draw the image at the appropriate point, applying the previous
        // canvas scales and translation(s):
        canvas.drawImage(marker, imageOffset, Paint());
    }
Now that we’ve implemented our own CustomPainter, we just need to wrap it in a
CustomPaint and a fixed size widget to use it. For example:
Container(
    width: 300,
    height: 300,
    child: CustomPaint(
    painter:
        StepGoalPainter(progress, imageMarker),
    ),
),
Here is how we use it:
I’ve used a stack and placed the progress fraction as a percentage on top of
the Container holding the CustomPaint.